A Multi Cloud Risk Management Approach to Visualize, Remediate Risk From A Single Pane Of Glass
A full video walkthrough of the code and can be found here:
What is compliance ?
The condition of being in conformity with set rules or requirements, or the act of doing so, is called compliance. For instance, software may be designed in accordance with standards body-created specifications and then implemented by user organizations in accordance with a vendor’s license terms. The term “compliance” may also refer to measures taken by organizations to make sure they are following laws and industry norms [1]. Due in part to the growing number of rules that force businesses to be diligent in keeping a complete grasp of their legal obligations for compliance, compliance is a common business worry. An organization must abide by rules or regulations set out by the government or by itself to meet compliance criteria.
What is AWS Prowler ?
“Prowler is an Open-Source security tool to perform AWS, GCP and Azure security best practices assessments, audits, incident response, continuous monitoring, hardening and forensics readiness. It contains hundreds of controls covering CIS, NIST 800, NIST CSF, CISA, RBI, FedRAMP, PCI-DSS, GDPR, HIPAA, FFIEC, SOC2, GXP, AWS Well-Architected Framework Security Pillar, AWS Foundational Technical Review (FTR), ENS (Spanish National Security Scheme) and your custom security frameworks”. [2].
Installing Prowler on Kali using AWS CLI
There are multiple ways of running Prowler, for this blog we are installing Prowler on Kali Linux inside VMware.
The first step involves installing the AWS cli from the blog post given below. When we install the CLI we need to be careful to generate keys which are temporary.
Once we install the AWS CLI we can generate the AWS ACCESS and keys and then use the
aws configure
command in the kali terminal in which we can then embed the keys for further use with prowler as given in the blog below:
[AWS Access Keys configuration] (https://k21academy.com/amazon-web-services/create-access-and-secret-keys-in-aws/)
Once everything is installed we can run :
aws --version
and
aws configure
As per the screenshot given below we can verify that the CLI and the access keys are installed.

Next we can install AWS Prowler using pip as given below:
pip install prowler
Once we install prowler we can use various compliance standards or run prowler with all the compliances by default
prowler aws --list-compliance
To run prowler for a particular compliance standard we can run, here the -o is used to give the output directory and we are using the pci_3.2.1 standard.
python3 -m prowler --compliance pci_3.2.1_aws -o /home/kali/pci_3.2.1_aws
Hence we can run prowler for various compliance standards and store the result as JSON, CSV or HTML and upload the same for visualization
Creating a misconfigured bucket to check prowler misconfigurations:

After creating this bucket, we can run prowler against the environment and open the html output and filter to the s3 service as given in the screenshot below, this shows various fields which are helpful such as the service name, the status of the check, the risk associated with the check and the compliance standards mapped to this check.

Copying the data from the local kali machine to the S3 Bucket
$aws s3 cp prowler-output-170668165872-20230801215351.csv S3_uri_from_aws_console
Running AWS prowler for different compliance standards
python3 -m prowler aws --list-compliance

We can directly send the output of prowler using the command:
python3 prowler aws -M csv -B s3://temphpbucket/test/
Refer to the link to automate sending files to s3 buckets:
Automated Deployment using AWS CDK:
The management and supply of infrastructure using code rather than human procedures is known as infrastructure as code (IaC). Your infrastructure requirements are produced as configuration files using IaC, making it simpler to change and share configurations. Additionally, it guarantees that you always supply the same environment. IaC facilitates configuration management and helps you prevent undocumented, ad hoc configuration changes by codifying and documenting your configuration standards. Continuous Integration/Continuous Delivery (CI/CD) and DevOps concepts are implemented in large part because to IaC. IaC frees developers from much of the provisioning labor; they may run a script to instantly have their infrastructure operational. In this manner, the infrastructure doesn’t delay application deployments, and sysadmins are spared from handling laborious manual procedures. Continuous Integration and Testing (CI/CD) requires continuous automation and monitoring at every stage of the application life cycle, from delivery and deployment to integration and testing. An environment must be consistent for it to be automated. When the operations team deploys and configures environments in a different way than the development team, automating application deployments is ineffective. [3]
To create an AWS CDK project we need to download the CDK from the link given below and create a repository as given in the link.
Creating a new project in AWS CDK
After the project is created, we get a folder structure as given below. In the folder we need to activate the environment and then pip install the requirements.txt , after that we need to paste the code below which takes an existing repository in ECR and runs it on an ECS cluster.

AWS CDK code to run Prowler on AWS using CDK v2 .
from aws_cdk import (
aws_ec2 as ec2, aws_ecs as ecs,
                     aws_ecs_patterns as ecs_patterns,
                     aws_iam as iam,
                     aws_ecr as ecr,
                     Stack
)


from constructs import Construct

class MyEcsConstructStack(Stack):

    def __init__(self, scope: Construct, construct_id: str, **kwargs) -> None:
        super().__init__(scope, construct_id, **kwargs)

        ecr_repository = ecr.Repository.from_repository_attributes(
            self,
            "ECRRepository",
            repository_name="prowler",
            # Run a command to get the arn of  https://awscli.amazonaws.com/v2/documentation/api/latest/reference/ecr/describe-repositories.html
            repository_arn="arn:aws:ecr:us-east-1:170668165872:repository/prowler"


            # repository_uri="AccountId.dkr.ecr.us-east-1.amazonaws.com/prowler:latest",
        )
        # The code that defines your stack goes here
        # example resource
        # queue = sqs.Queue(
        #     self, "MyEcsConstructQueue",
        #     visibility_timeout=Duration.seconds(300),
        # )
        vpc = ec2.Vpc(self, "MyVpc", max_azs=2)     # default is all AZs in region
        existing_task_role_arn = "arn:aws:iam::170668165872:role/ecsTaskExecutionRole"
        existing_execution_role_arn = "arn:aws:iam::170668165872:role/ecsTaskExecutionRole"
        # Define a task role using the provided ARN
        task_role = iam.Role.from_role_arn(
            self,
            "ExistingTaskRole",
            role_arn=existing_task_role_arn,
        )
        # ecr_repository.grant_pull(task_role)
        # Define a task execution role using the provided ARN
        execution_role = iam.Role.from_role_arn(
            self,
            "ExistingExecutionRole",
            role_arn=existing_execution_role_arn,
        )
        cluster = ecs.Cluster(self, "MyCluster", vpc=vpc)
        ecs_patterns.ApplicationLoadBalancedFargateService(self, "MyFargateService",
            cluster=cluster,            # Required
            cpu=512,                    # Default is 256
            desired_count=1,            # Default is 1
            task_image_options=ecs_patterns.ApplicationLoadBalancedTaskImageOptions(
            image=ecs.ContainerImage.from_ecr_repository(repository= ecr_repository, tag="latest"),
            task_role=task_role,  # Assign the existing task role
            execution_role=execution_role,  # Assign the existing execution role
            container_name="prowler"
            ),
            memory_limit_mib=2048,      # Default is 512
            public_load_balancer=True)  # Default is True
After pasting this code run
cdk synth
This above command can synthesize the code into terraform templates and if there are no errors we can run:
cdk deploy
This above command can deploy the templates to the cloud which can help in creation and initiation of resources to run.
Once we have created all the resources and run the tool we can then destroy the resources so that it does not incur additional cost by running the command given below:
cdk destroy
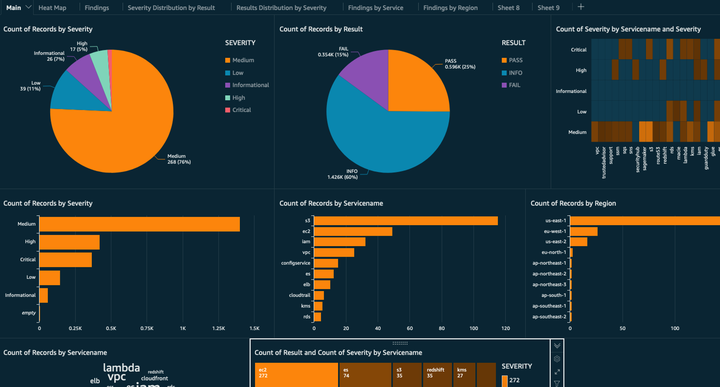
Creating the Quicksight Dashboards:

We need to open our AWS Console and sign up for Quicksight with the Author plan which lets us create and edit and data and dashboards. This pricing plan costs about 18$ per month and we have a free trial for 30 days.
During the Sign Up process there are multiple permissions which can be given, in the screenshot below, allow Quicksight to read the data from S3 buckets:

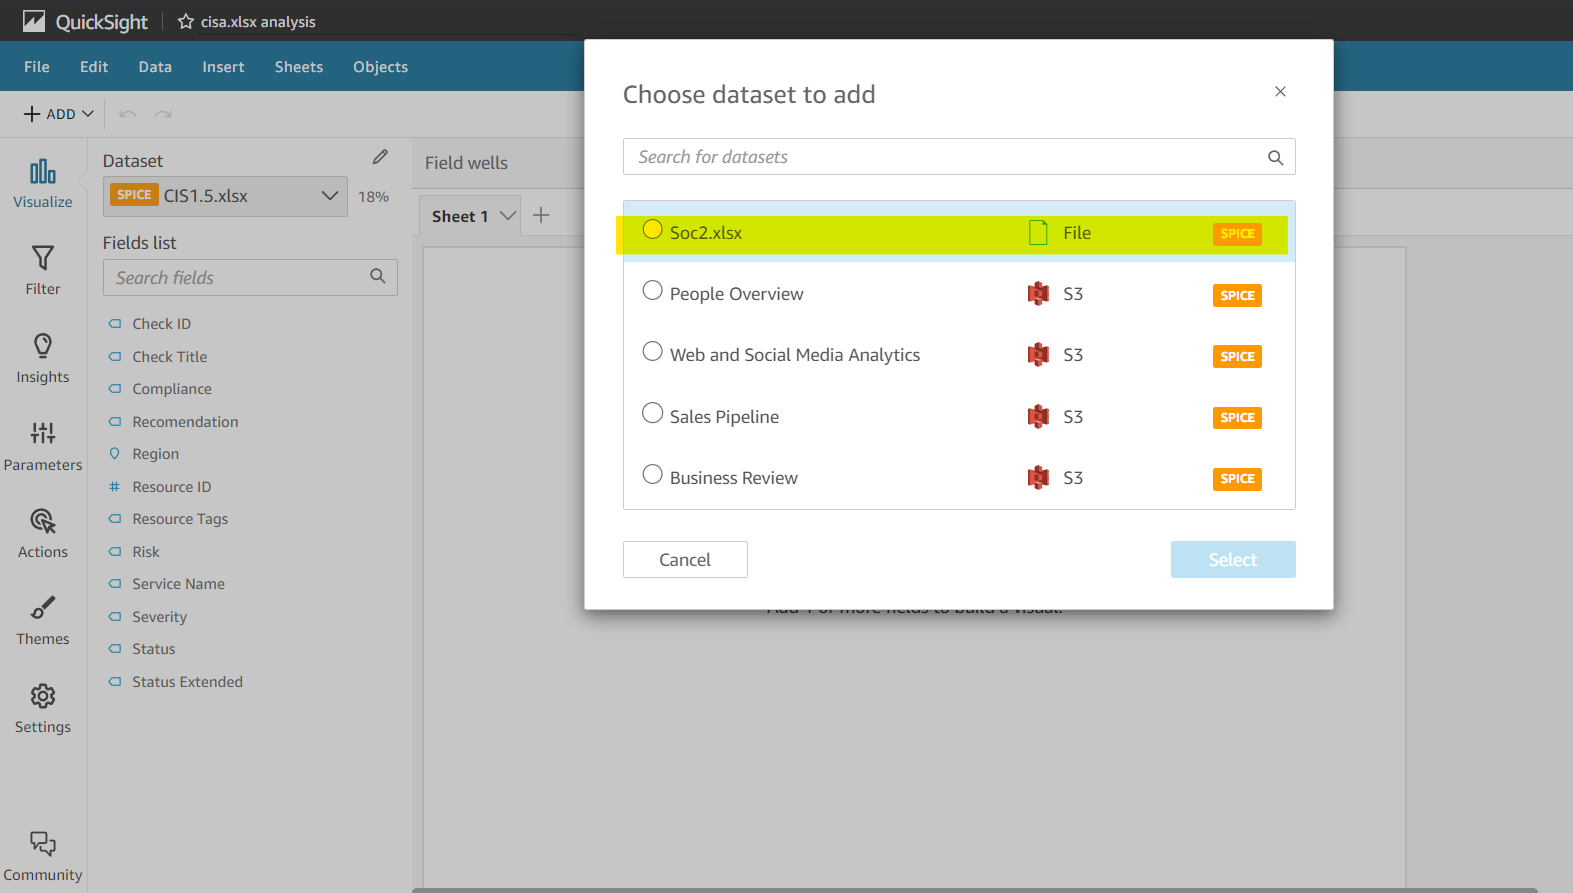
Once we have signed up, we can create a datasets as given in the screenshots below :
Click on the Datasets option and uplod the CSV files generated from Prowler. Once we upload all our datasets to Quicksight, we create Analysis where we can combine various datasets into a single dashboard. Now we can add the dataset to a given analysis by following the steps highlighted in the screenshot below. Once the dataset is added to Quicksight we can check the Table option and check the dataset along with the Dataset as given below, by selecting the Field list we can add the rows for the table selected.

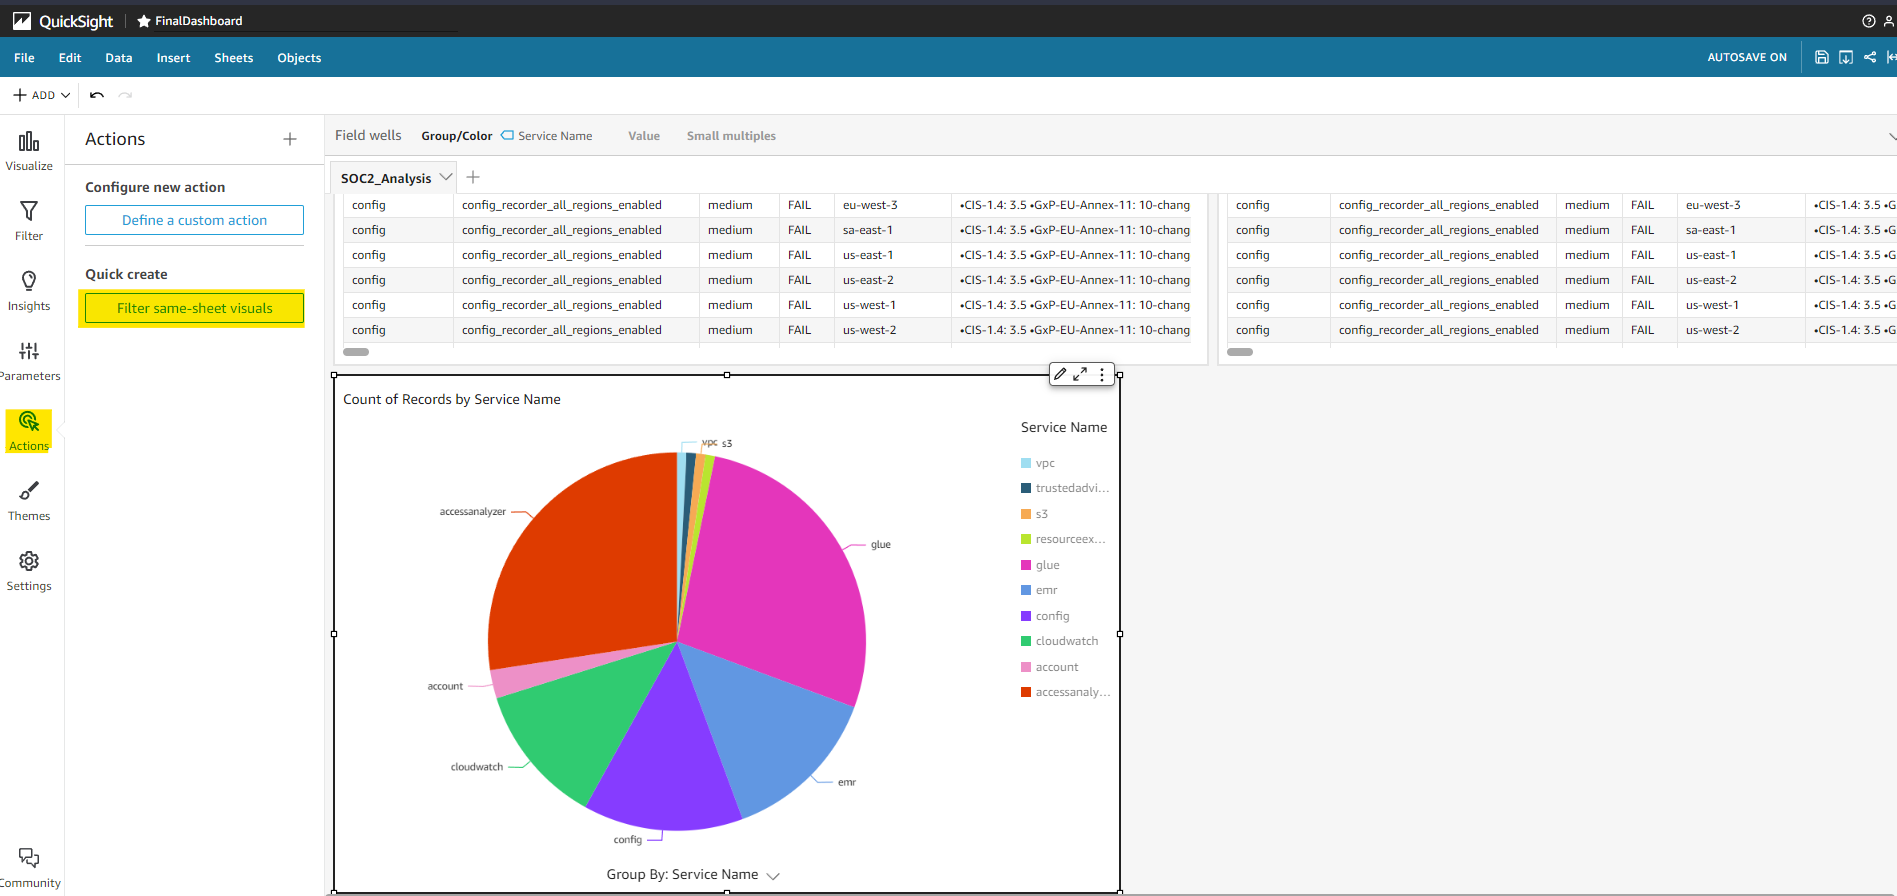
In the screenshot given below we can combine multiple datasets into a single analysis.
Once we add multiple datasets to an Analysis we have an option in Quicksight to filter by visual which can be seen in the highlighted screenshot below. Once we filter by this method the data from all the charts filter to the same point. To do this we need to select the chart and click on Action, in this section there is an option called Filter same-sheet-visuals
Once we add the datasets to a given analysis, we can publish the data to a Dashboard by clicking the Share option in the top right side of the analysis.
References:
[1] https://www.techtarget.com/searchdatamanagement/definition/compliance
Hari Pranav A
My research interests include Decentralized Computing, Cloud Security and Dev Ops