Automated Email Notification Service for Data Engineering Pipelines
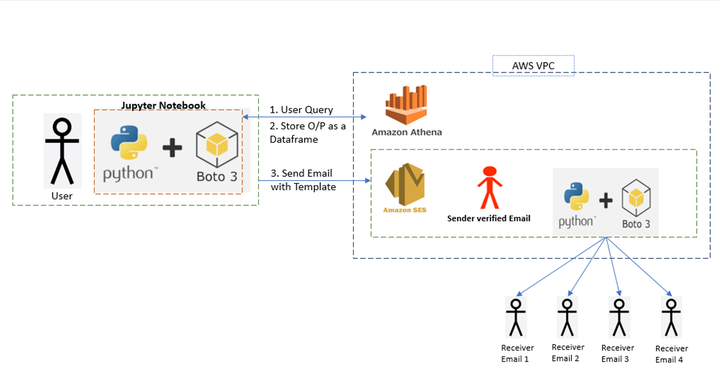
Every DataLake project requires a notification service which can send Emails with a prescribed template body to various stake holders both within and outside the organization. This requires the configuration of a mail server and whitelisting of domains which is often difficult to maintain and also there limitations on the number of email Id’s which can be configured.
AWS provides us with various services like SNS(Simple Notification Service) which works on the pub/sub model and the downside is that every Receiver email Id needs to be verified before we can mail them which is a manual process. Also we cannot create templates which can be reused for different use cases, Hence there is a need to Automate the sending of Email’s which can run as a Cron Job based on the estimated frequency.
In this blog post we will be using the AWS Simple Mailing Service along with a python script to
-
Query the Athena Table in AWS and get the results containing Email Ids as a dataframe.
-
Store the file with the Email Ids in the Json format
-
Automatically trigger the AWS SES service to send an email to the respective Email Ids which were generated in Step 2

1. Query Athena Table in AWS:
We need to install the AWS cli as shown in the blog post below.
Once the CLI is installed we get access to all the services using the command line, hence we can create scripts to automate various tasks and map them to cron jobs.
Then we need to install the Boto3 library by running in our cmd line within our project folder.
$ mkdir projects

$ cd projects

$ pip install boto3
After this is done we need to set the From id of the sender. For this we need to open AWS console and search for SES service, then create an identity and choose Email Id as shown in the screenshot below.

Once this is submitted we need to open our mailbox and confirm the link from AWS. If we want to send email to others who have not confirmed their subscription to AWS, then we need to request for a change in the quota as shown below.
Python Script to Automate the Email Process
Next we need to write a python script which can query Athena and get back the results as a data frame. Open a new file copy paste the code below.
import awswrangler as wr
import pandas as pd
import numpy as np
import json

df=wr.athena.read_sql_query("Select * from TABLE_NAME", database="DATABASE_NAME")
In the above code we are sending a query request to AWS using the Boto3 library which has various functions like wr.athena.read_sql_query which can read the data from the Athena Table and get the results in a dataframe. Here df is the dataframe which can store the result of the query.
2. Store the file with the Email Ids in the Json format
x = df.to_string(header=False,
                index=False,
                index_names=False).split('\n')
vals = [','.join(ele.split()) for ele in x]
In this step we are converting the the emails to a string and using the split function to get the email id’s in the desired format.
a = {"ToAddresses":  [], "CcAddresses": vals ,"BccAddresses": [] }

y = json.dumps(a)

with open(r"INPUT_YOUR_PATH\destination.json", "w") as outfile:
    outfile.write(y)
In the code above we are creating a string a and adding the To address. Then we are converting it to JSON format in a variable called y. Then we are writing the contents into a file called destination.json.
Full code to Query athena and store the emails as json is given below:
import awswrangler as wr
import pandas as pd
import numpy as np
import json

df=wr.athena.read_sql_query("Select * from TABLE_NAME", database="DATABASE_NAME")

x = df.to_string(header=False,
                index=False,
                index_names=False).split('\n')
vals = [','.join(ele.split()) for ele in x]

a = {"ToAddresses":  [], "CcAddresses": vals ,"BccAddresses": [] }

y = json.dumps(a)

#print(y)

with open(r"INPUT_YOUR_PATH\destination.json", "w") as outfile:
    outfile.write(y)
Then we need to create another file called Message.json and paste the code as shown below
{
    "Subject": {
        "Data": "Test email sent using the AWS CLI",
        "Charset": "UTF-8"
    },
    "Body": {
        "Text": {
            "Data": "This is the message body in text format.",
            "Charset": "UTF-8"
        },
        "Html": {
            "Data": "This message body contains HTML formatting. It can, for example, contain links like this one: <a class=\"ulink\" href=\"http://docs.aws.amazon.com/ses/latest/DeveloperGuide\" target=\"_blank\">Amazon SES Developer Guide</a>.",
            "Charset": "UTF-8"
        }
    }
}
As we can see in the above JSON message, the Body and the Content of the Message can be set as templates.
3. The command which can be used to automate the sending of mails.
We need to run the command as shown below which will use the AWS SES API to send an email with the DESTINATION AND THE MESSAGE FILE to the respective Email IDs
$ aws ses send-email --from **ENTER YOUR VERIFIED MAIL ID** --destination file://destination.json --message file://message.json
Once we run this command as shown above, we can send emails from the verified Email Id’s with a predefined template to other email Id’s.
Hari Pranav A
My research interests include Decentralized Computing, Cloud Security and Dev Ops