Threat Modelling Using Wazuh
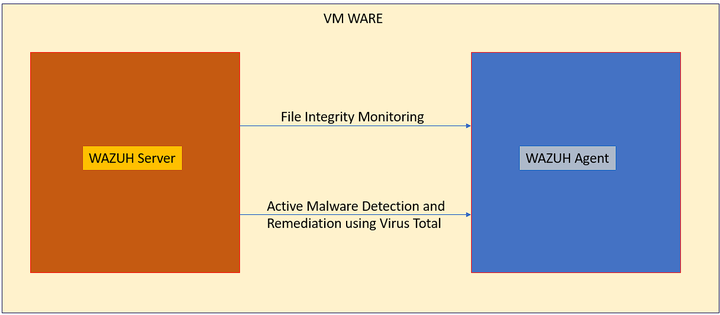
Wazuh is a platform which can perform threat modelling, end point security, security operations center and cloud security. It also has integrations with various network monitoring tools such as Suricata and tools such as Virus total for active threat remediation. In this blog we will explore deploy the Wazuh server on a virtual machine and deploy the Wazuh agent in another VM. Then we will integrate various tools to monitor, test and remediate malicious activity in the network.
Setting up agents on Wazuh:
From the screenshot below we need to open our terminal and type:
$ipconfig
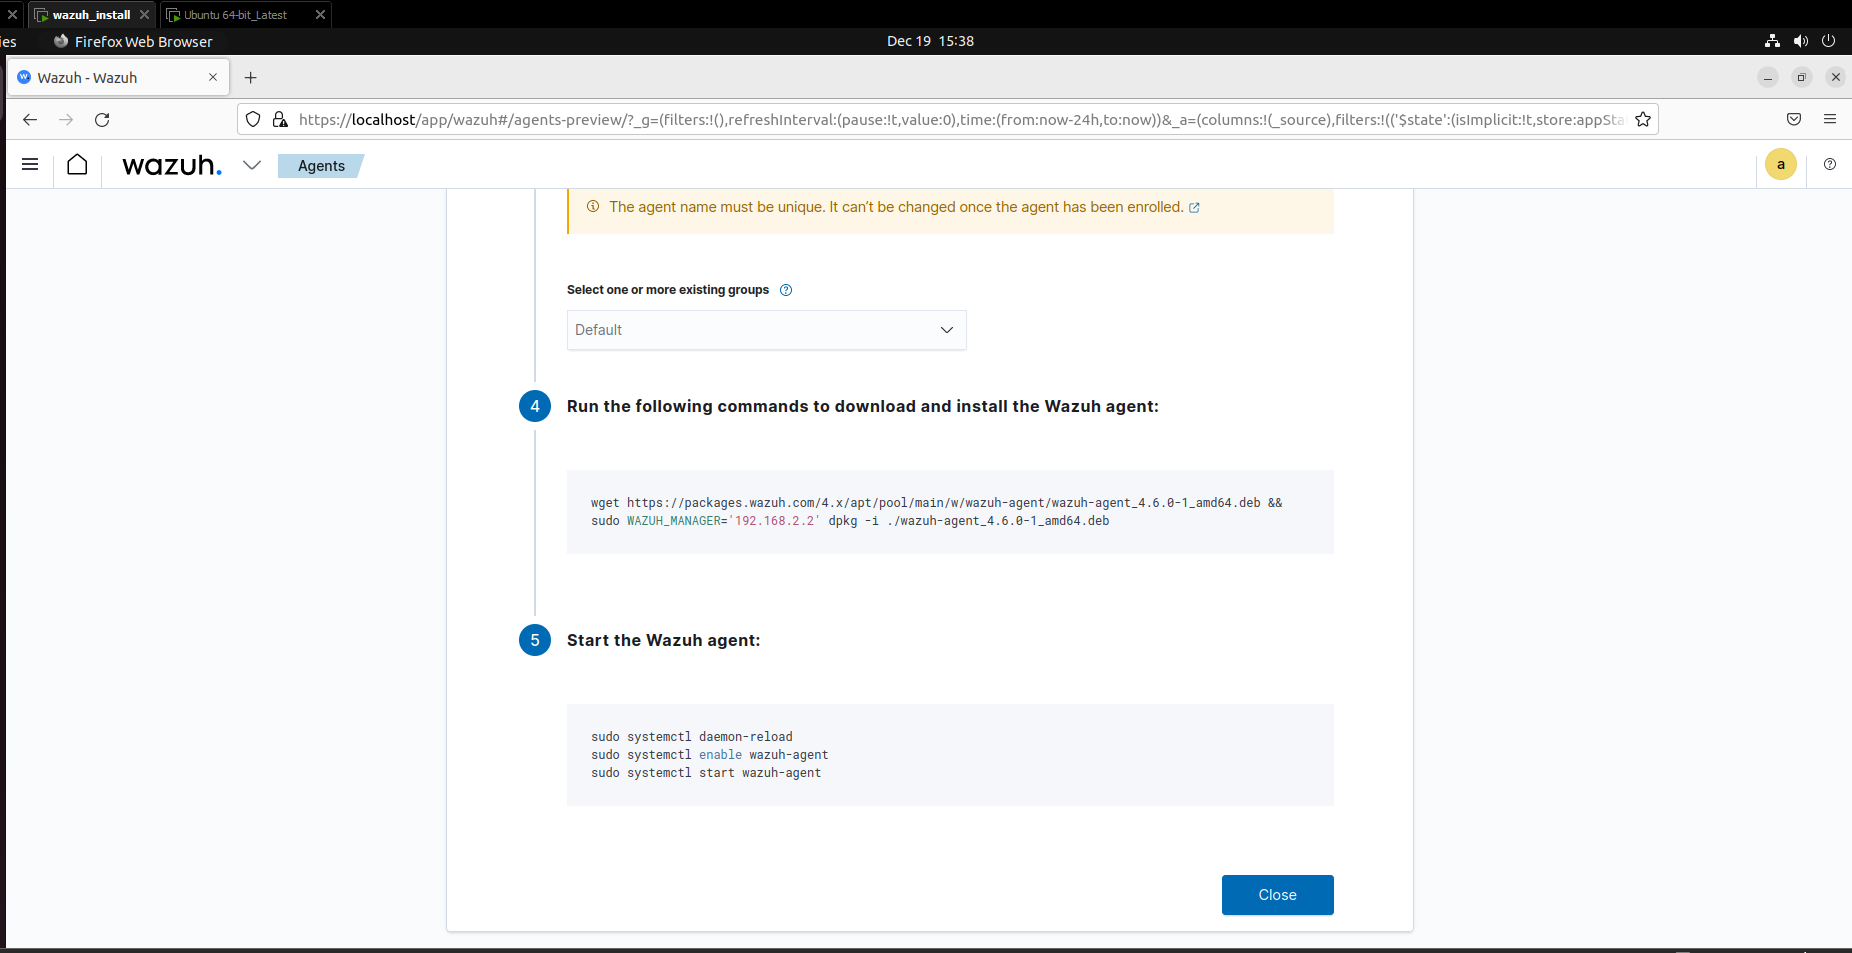
This command gives the IP address of the machine where our Wazuh server is running. Then based on this information, we need to login into the Wazuh dashboard as shown in the right side of the screenshot and click on “Agents” and click on “Deploy new Agent”. Then we need to choose the platform where we need to deploy the agent, for example if we have a windows machine or if we have an ubuntu based machine the commands will vary. In our case we have another instance of ubuntu in our VM. As per the screenshot we need to input the IP address of the Wazuh machine into the “Assign a Server Address” section.

Next, we need to run the following commands inside our new ubuntu machine as given below:
Once all the steps have been completed successfully we can see in the Wazuh dashboard that it is getting the logs from the Ubuntu machine. Next we are going to set up file integrity monitoring on the Ubuntu machine. Here we enable certain functionalities in which if the user downloads a file in the ubuntu machine and makes any changes to it then, the logs can be seen on the Wazuh dashboard and appropriate action can be taken on it.
We need to navigate to the directory on our Ubuntu machine where the agent has been installed:
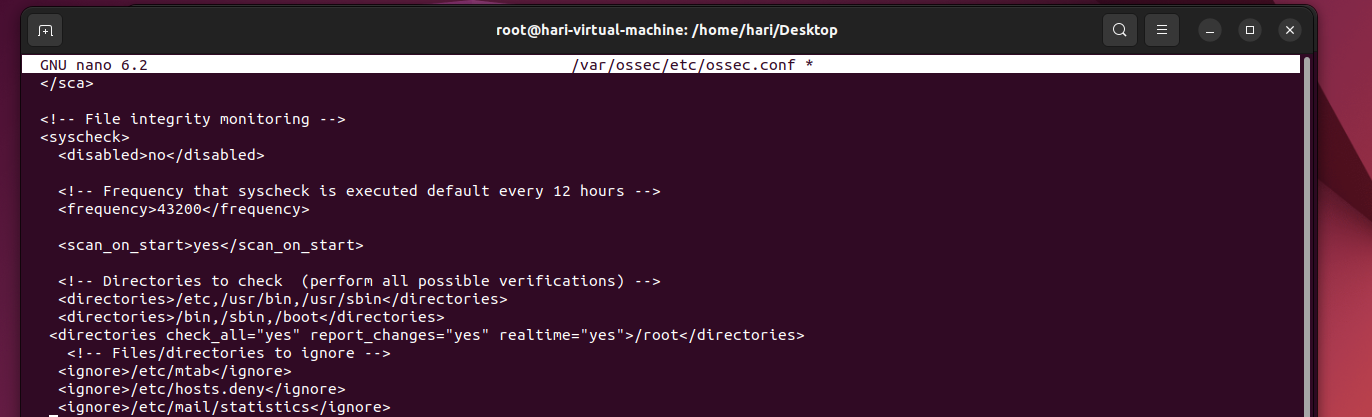
nano /var/etc/ossec/ossec.conf
Add the following lines under the syscheck section as shown in the screenshot below:
<directories check_all="yes" report_changes="yes" realtime="yes">/root</directories>
Next we need to restart the Wazuh agent using the command:
sudo systemctl restart wazuh-agent
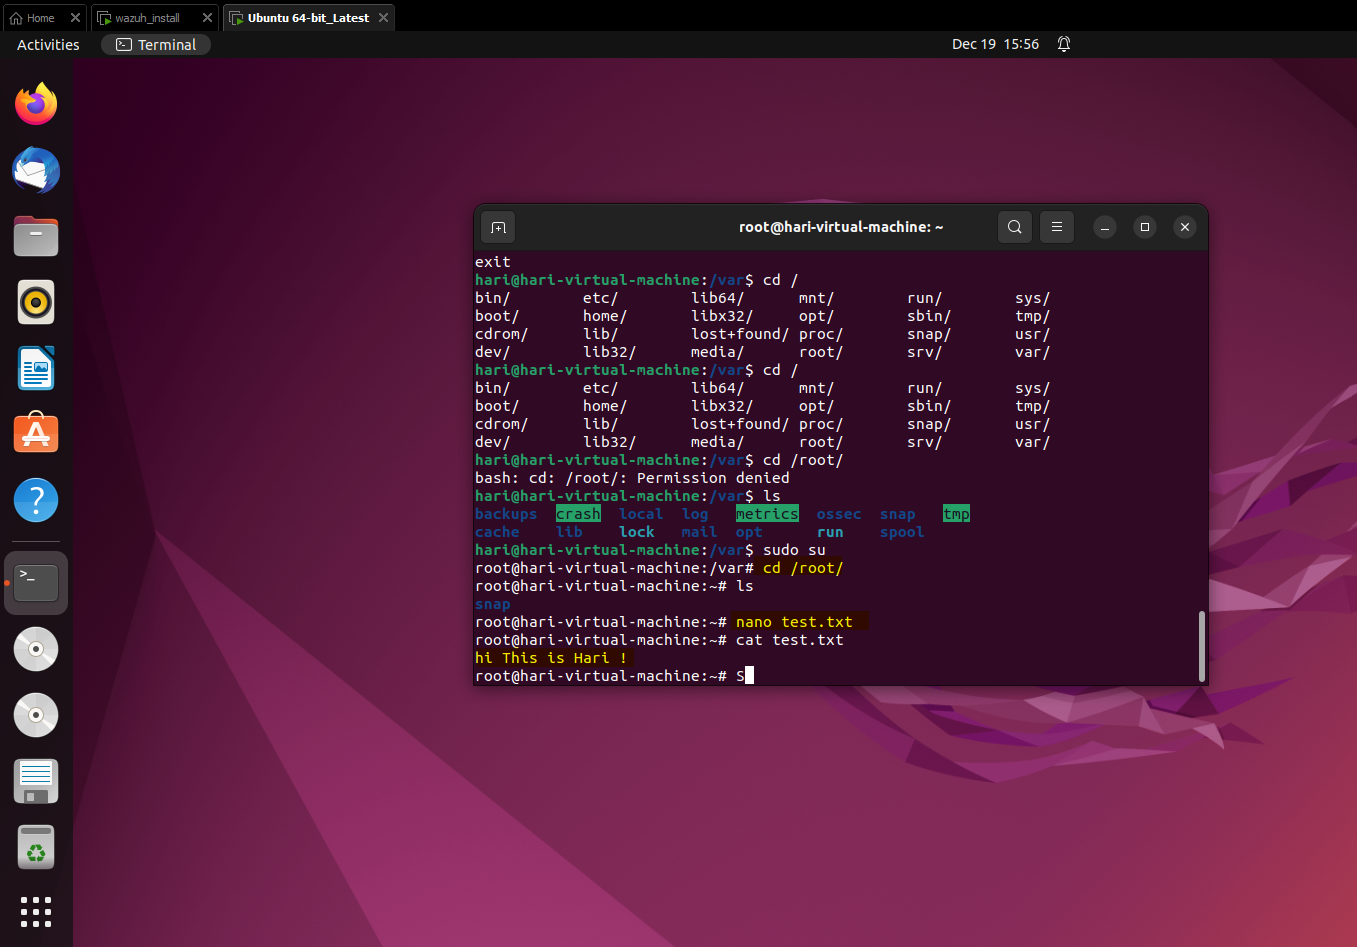
Now in the ubuntu machine we need to create a new file in the root directory then, add contents into it and then after some time delete the file. Once this is done, we can switch back to the Wazuh machine and explore the logs. In the screenshot below on the Ubuntu machine we have done the same as given below:
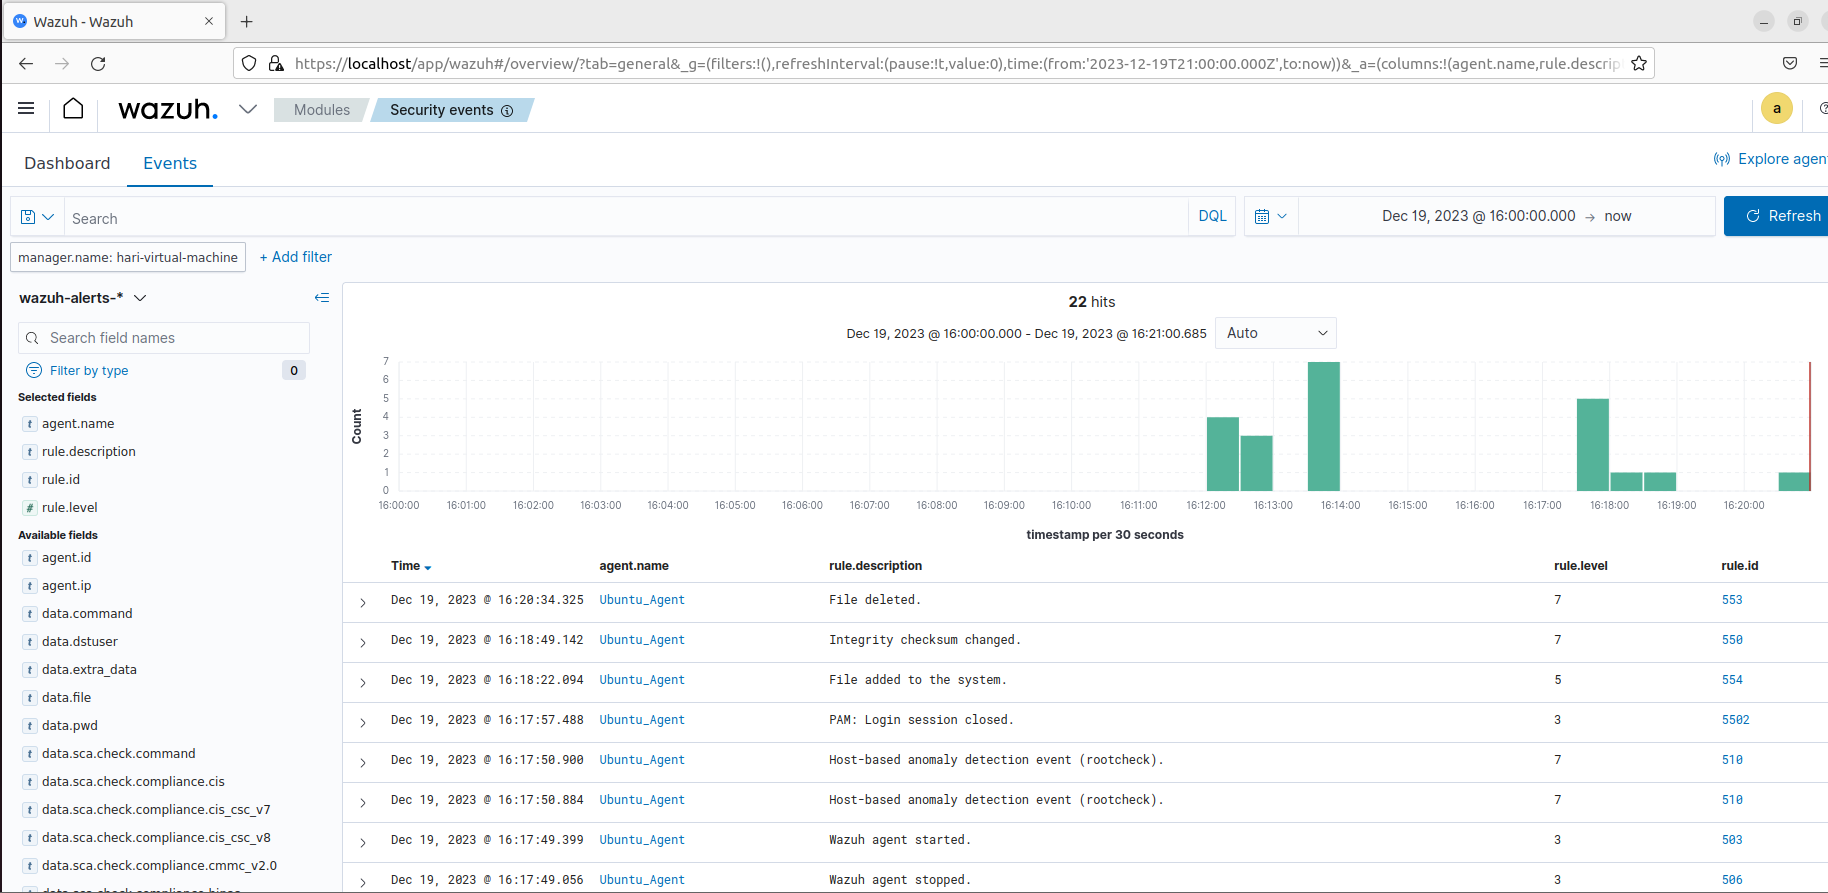
Switching back to the Wazuh dashboard we need to navigate to Security - > Events and checking the same we can see the Rule Id:553, 550 and 554 have details about file integrity monitoring.
Integration of Virus Total API with Wazuh for enabling detection and autoremediation of malicious files:
We need to register on the Virus Total website in the link given below to get access to the API key.

Once we get the API key, we need to save it for future use, then open the endpoint Ubuntu machine and we need to change directory as given below:
sudo su

nano /var/ossec/etc/ossec.conf
In this file we need to edit check for the
<directories realtime="yes">/root</directories>
Next we need to install JQ which can be used to process JSON input
sudo apt update

sudo apt -y install jq
After installing JQ the next step is to make sure that the threat gets removed, hence we need to navigate into the directory given below.
nano /var/ossec/active-response/bin/remove-threat.sh
Then paste the lines given below:
#!/bin/bash

LOCAL=`dirname $0`;
cd $LOCAL
cd ../

PWD=`pwd`

read INPUT_JSON
FILENAME=$(echo $INPUT_JSON | jq -r .parameters.alert.data.virustotal.source.file)
COMMAND=$(echo $INPUT_JSON | jq -r .command)
LOG_FILE="${PWD}/../logs/active-responses.log"

#------------------------ Analyze command -------------------------#
if [ ${COMMAND} = "add" ]
then
 # Send control message to execd
 printf '{"version":1,"origin":{"name":"remove-threat","module":"active-response"},"command":"check_keys", "parameters":{"keys":[]}}\n'

 read RESPONSE
 COMMAND2=$(echo $RESPONSE | jq -r .command)
 if [ ${COMMAND2} != "continue" ]
 then
  echo "`date '+%Y/%m/%d %H:%M:%S'` $0: $INPUT_JSON Remove threat active response aborted" >> ${LOG_FILE}
  exit 0;
 fi
fi

# Removing file
rm -f $FILENAME
if [ $? -eq 0 ]; then
 echo "`date '+%Y/%m/%d %H:%M:%S'` $0: $INPUT_JSON Successfully removed threat" >> ${LOG_FILE}
else
 echo "`date '+%Y/%m/%d %H:%M:%S'` $0: $INPUT_JSON Error removing threat" >> ${LOG_FILE}
fi

exit 0;
Next we need to change the file ownership and permissions so that the user group can delete the file created in the root directory.
sudo chmod 750 /var/ossec/active-response/bin/remove-threat.sh
sudo chown root:wazuh /var/ossec/active-response/bin/remove-threat.sh
After doing this we need to restart the Wazuh agent as given below:
sudo systemctl restart wazuh-agent
We now switch back to the Wazuh Server and edit the following file to make sure that the virus total integration works.
nano /var/ossec/etc/rules/local_rules.xml
<group name="syscheck,pci_dss_11.5,nist_800_53_SI.7,">
    <!-- Rules for Linux systems -->
    <rule id="100200" level="7">
        <if_sid>550</if_sid>
        <field name="file">/root</field>
        <description>File modified in /root directory.</description>
    </rule>
    <rule id="100201" level="7">
        <if_sid>554</if_sid>
        <field name="file">/root</field>
        <description>File added to /root directory.</description>
    </rule>
</group>
We now need to add the API key and trigger event rules with ID 100200 and 100201 into the file as given below:
nano /var/ossec/etc/ossec.conf
<ossec_config>
  <integration>
    <name>virustotal</name>
    <api_key><YOUR_VIRUS_TOTAL_API_KEY></api_key> <!-- Replace with your VirusTotal API key -->
    <rule_id>100200,100201</rule_id>
    <alert_format>json</alert_format>
  </integration>
</ossec_config>
Then we need to enable active response and trigger the remove-threat.sh file when Virus total finds a malicious file which can be seen below:
nano /var/ossec/etc/ossec.conf
<ossec_config>
  <command>
    <name>remove-threat</name>
    <executable>remove-threat.sh</executable>
    <timeout_allowed>no</timeout_allowed>
  </command>

  <active-response>
    <disabled>no</disabled>
    <command>remove-threat</command>
    <location>local</location>
    <rules_id>87105</rules_id>
  </active-response>
</ossec_config>
Next to add the following lines to make the Wazuh server alert us about the active response as given below:
<group name="virustotal,">
  <rule id="100092" level="12">
    <if_sid>657</if_sid>
    <match>Successfully removed threat</match>
    <description>$(parameters.program) removed threat located at $(parameters.alert.data.virustotal.source.file)</description>
  </rule>

  <rule id="100093" level="12">
    <if_sid>657</if_sid>
    <match>Error removing threat</match>
    <description>Error removing threat located at $(parameters.alert.data.virustotal.source.file)</description>
  </rule>
</group>
Next we can restart the server:
sudo systemctl restart wazuh-manager
After restarting, we need to switch back to our Ubuntu End point where we have the agent installed and download a malicious file as given below:
sudo cd /root

sudo curl -LO https://secure.eicar.org/eicar.com && ls -lah eicar.com

The screenshot below shows the Wazuh dashboard in which the file was automatically removed along with the PID.

Hence with this integration in place we have set up an automated system which can actively scan and validate files for malicious activity and remediate the issues before users run it. !!!
Hari Pranav A
My research interests include Decentralized Computing, Cloud Security and Dev Ops